
 Liliana Bell, MHA, PMP
 A Framework for Structured Improvement
In any effort to enhance patient care or optimize clinical workflows, having a reliable method for implementing change is essential. The PDSA (Plan-Do-Study-Act) cycle provides a simple yet powerful scientific framework for testing improvement ideas on a small scale before implementing them widely. By breaking the improvement process down into four logical stages, the cycle allows teams to learn from their actions and make informed decisions based on data, not assumptions.
This iterative approach reduces risk, accelerates learning, and helps build momentum for change. Before beginning, it is important to have a completed project charter to provide a clear roadmap and ensure the team can accurately measure the effectiveness of its change ideas. The PDSA cycle equips teams with a practical method to drive effective and sustainable improvements, turning ideas into measurable results.
Resources
The following video collection provides a comprehensive, step-by-step guide to the PDSA method. The series begins with a high-level introduction, dedicates a video to each of the four stages, and concludes with a summary of how to use these tools together as part of a complete quality improvement toolkit.
Introduction to the PDSA Method
This video provides a high-level overview of the PDSA cycle, defining the four stages—Plan, Do, Study, and Act. It explains how the method provides a framework for testing improvement ideas on a small scale to drive effective and sustainable improvements in a controlled way.
Transcript: Introduction to the PDSA Cycle
Throughout your team’s journey to enhance patient care and optimize workflows, it’s important to have a reliable method for implementing changes.
One such method is the PDSA cycle. PDSA stands for Plan, Do, Study, Act. The PDSA cycle provides a framework for testing and refining your improvement ideas on a small scale before implementing them widely.
Here’s a quick overview of each stage.
Plan — start by identifying a goal and developing a detailed plan to test your team’s change. Planning involves predicting the outcomes and deciding what data to collect.
Do — implement the plan on a small scale. It’s about trialing the change and documenting what happens, including any unplanned issues.
Study — analyze the collected data to compare your team’s results against the predictions. The analysis helps your team understand whether the change led to an improvement or not.
Act — finally, based on your team’s analysis, decide the next steps. If the change was successful, consider implementing it on a larger scale. If not, refine the approach or try a different strategy.
The PDSA cycle enables your team to test changes in a controlled way, learn from the results, and make informed decisions. It’s a valuable tool that equips teams with practical methods to drive effective and sustainable improvements.
Before your team begins your PDSA cycle, it’s important to remember that a completed project charter will help your team plan a roadmap for change.
A completed charter ensures your team can accurately gauge where it is headed on its change journey, as well as accurately measure the effectiveness of the change idea.
PDSA: Plan
The planning stage is about designing a small, safe, and intentional test. This video walks you through how to clarify your objective, detail the specific actions of your test (the who, what, when, and where), form a hypothesis by predicting the outcome, and create a simple, relevant plan for collecting data.
Transcript: PDSA: Plan
Now that your team has an idea you want to test, you’re ready to enter the first stage of the PDSA cycle– plan. This stage is all about being intentional before your team tries anything.
The goal here isn’t to prove your team’s idea is perfect or to quickly overhaul an entire system. Instead, you’re designing a small, safe, and time-bound test focused on a simple question–
What can your team learn from this change? Your team will want to think through your test’s who, what, when, and where, and predict what you expect to happen. Before your team can test anything, you must clarify the objective.
Ask your team– what specific question are we trying to answer with this test? Is your team trying to see if a new communication script reduces patient anxiety, or if a revised room cleaning protocol can be completed more efficiently?
Once your team has designed the question, detail the specific actions that will occur, what will happen, when and where will it occur, and who will be involved.
Remember, your team doesn’t need to test at scale. Starting small is powerful because it reduces risk, accelerates learning, and makes it easier to link actions to outcomes. Testing with just one person on one unit for one day is a great way to start.
The next step is critical. Predict what your team thinks will happen. Prediction is where your team makes its best educated guess, forming a hypothesis for your test.
Based on your team’s collective understanding, what do you expect the result to be? What does success look like for this specific test? Making a prediction addition sharpen your team’s thinking and makes the study phase much more effective if the outcome matches your prediction, you’ve confirmed your understanding. And if it doesn’t, you’ve learned something new and unexpected.
Finally, your team needs a plan for collecting data. Learning from a test is hard if you don’t track what happens.
Decide what your team will measure and how you will measure it. Who will collect the data, and when will they do it? The key here is to keep it simple, relevant, and doable.
The data collection should not be a burden. Consider what information can be gathered quickly and easily within the existing workflow. A thoughtful plan is the foundation of a successful test. It ensures your team is aligned and ready to learn, which sets you up for the next stage– do.
PDSA: Do
With a detailed plan in place, your team moves to the “Do” stage. This video explains the critical tasks of this phase: performing the test exactly as designed, carefully observing and documenting what happens (especially the unexpected), and following through on the data collection plan to ensure you have what you need for analysis.
Transcript: PDSA: Do
With your detailed plan in place, it’s time to move into the second stage of the PDSA cycle– do. In this stage, your team puts its plan into action and observes what happens.
Now it’s time to run your test. Your team’s primary task in the do stage is to perform the test exactly as designed. Following the plan precisely is critical.
If your team changes things mid-test, it will be hard to understand what actually worked, and what didn’t. Remember to stick to the scope your team defined. If you plan a small controlled test, keep it that way.
This is a quick experiment designed for learning, not a permanent, large-scale rollout. As your team conducts the test, you can summarize your actions in your project status report.
As your team runs the test, you should also be observing closely. The goal is to capture what’s happening in real time, especially the unexpected. Keep an eye out for anything that doesn’t go exactly as planned–
that a step gets skipped. Did someone interpret an instruction differently than your team intended? Write down any practical challenges, points of confusion, or surprises, whether they seem positive or negative.
These small details often hold valuable insights for refining your team’s change. The final part of the do stage is to follow through on your team’s data collection plan.
Once the test is complete, review the information you gathered. Did your team get what it needed? Ask your team a key question– was the data collected as planned? Is it complete, accurate, and usable? Did everyone involved understand the data collection process?
This is your moment to check for any gaps. Ensuring your data aligns with your original measurement plan is essential for the study phase.
By running the test, documenting observations, and collecting data, your team has successfully completed the do stage. Now, your team has everything it needs to move on to the next stage, where the real learning begins.
PDSA: Study
The “Study” stage is where your team steps back to reflect and learn. This video guides you through the process of comparing your actual results to the predictions you made in the planning stage, summarizing the key takeaways from the test, and identifying any barriers or unintended consequences that arose.
Transcript: PDSA: Study
Your team has completed its test and collected the data. Now your team moves to the study stage. This is perhaps the most important phase of the cycle, as it’s where your team steps back to reflect, analyze, and learn from the test.
The first step in the study phase is to compare what actually happened with what your team predicted would happen back in the planning stage. Lay out your results and ask your team– did the results match our predictions?
If they did, that’s useful to know. But if they didn’t, that’s often where the most valuable learning happens. Discuss where the results differed and try to understand why. Were there any surprises– either positive or negative?
Comparing the actual results to your prediction helps your team understand if the change had the desired effect.
Next, your team should work together to summarize the main takeaways from the test. Every test teaches you something, regardless of whether it worked or not.
Take a moment to document what went well and what should be repeated in the future. Just as importantly, identify what didn’t go well and should be changed or avoided in the next cycle. This process creates a learning archive for your team and helps you build smarter tests going forward.
Finally, it is crucial to identify and discuss any barriers that got in the way. Understanding these obstacles is just as important as measuring success.
What slowed your team down or made the change harder to implement? Were there logistical challenges, like a needed piece of equipment that was unavailable? Did your team encounter resistance or system limitations?
Were there any unintended consequences? Sometimes, these barriers reveal where the real work is needed to make progress happen.
With the analysis complete, your team is now ready to make an informed decision in the final stage act.
PDSA: Act
In the final stage, your team’s learning translates into a decision. This video outlines the three distinct options you have—Adopt, Adapt, or Abandon—based on the results of your test. It explains how to justify your choice to stakeholders and details the next steps required for each path, whether it’s standardizing a successful change or planning a new cycle.
Transcript: PDSA: Act
After analyzing your team’s results in the study phase, you’ve arrived at the final stage of the PDSA cycle– act. In the act stage, your team’s learning translates into a concrete decision about what to do next.
Based on what you learned from your test, your team needs to make a decision. You have three distinct options.
First, you can adopt the change. Adoption is the right choice when your test was successful and the change worked well. Adopting means the team is ready to keep the change and make it a standard part of your process.
Second, you can adapt the change. Choose this path if your test showed promise but also highlighted areas for improvement. Adapting means the idea has potential. Your team will need to revise the change and test it again in a new PDSA cycle.
Finally, you can abandon the change. If the test didn’t work or cause negative consequences, it’s best to move on. Abandoning an idea isn’t a failure. It’s an informed decision that prevents your team from wasting time on an approach that isn’t effective.
Whatever your team decides, everyone on your team and all stakeholders need to understand the decision. Use the data on observations from the test to support your team’s decision. Summarize the key takeaways that influence your team’s choice. Justification creates clarity and ensures everyone shares the same understanding as your team moves forward.
If your team decides to adopt the change, the goal is to make it stick. Adopting a change involves creating tools like checklists, guides, or Standard Operating Procedures, also called SOPs. These tools ensure the process is consistent.
Your team will need to train staff, document best practices, and continue monitoring performance over time to ensure the gains are sustained. Once it’s working well, your team can think about spreading it into other areas.
If your team chooses to adapt, it’s time to refine the change idea based on what was learned. Adjust the process based on feedback and what didn’t quite work. Your team might need to clarify instructions, adjust when certain steps occur, or simplify parts of the process.
Once your team has reworked the change, a new PDSA cycle will be planned to test the revised version.
Remember, improvement rarely follows a straight line. Iteration, with its ups and downs, is a fundamental part of the process.
If your team abandons the change, its main task is to capture what it has learned, explain what didn’t work, and why. It’s important to share these findings with stakeholders to prevent the team from repeating mistakes.
Then, your team can explore alternative solutions and begin the improvement cycle again with a new idea.
Whether your team chooses to adopt, adapt, or abandon, the work of improvement continues. One cycle’s act stage is the bridge to the plan stage of the next.
Ask your team– what’s the next question? What’s the next idea worth testing?
This iterative work is how you can collaboratively build momentum and drive continuous improvement one cycle at a time.
Putting It All Together: Your QI Toolkit
This concluding video connects the PDSA cycle to the broader quality improvement toolkit, showing how tools like the project charter work together to support a structured improvement process. It offers final tips for getting started and highlights additional resources for teams ready to continue their improvement journey.
Transcript: Pulling It All Together: Your QI Toolkit
We’ve covered a lot of ground, from setting an aim to running your first PDSA cycle. Let’s connect the dots and see how your quality improvement toolkit works together to support your efforts.
Think of these tools as a clear, structured, and repeatable process for improvement. The project charter helps your team start strong. It aligns your team by answering the three core questions of the model for improvement–
What are you trying to accomplish?
How you’ll measure success, and what changes might lead to improvement.
Your project summary is your team’s learning log. It helps your team to track what’s happening throughout each PDSA cycle, keeping your decisions and key findings visible so your team can make informed choices about what to do next.
Together, these tools provide everything you need to guide your improvement project from start to finish.
As you prepare for your team project, remember these final tips. First, improvement doesn’t have to be overwhelming. Start small, learn quickly, and adapt often.
The model for improvement allows your team to test and learn, not guess and wait.
Second, remember that this is a flexible framework, not a rigid formula. Your team can adapt it to fit the unique needs of your team and your specific project.
And most importantly, remember that every test builds your team’s improvement skills, even if it fails. Every outcome is a learning opportunity that gets you one step closer to making positive change.
Your improvement journey doesn’t have to end here. If your team is ready to take this further, many resources are available to support you. We recommend exploring the Institute for Healthcare Improvement’s Open School and QI Essentials Toolkit, or check out resources available on the Agency for Healthcare Research and Quality’s website.
And remember to use the templates we’ve covered to get started right away. You and your team have the tools and the framework to make a real, measurable difference.
Now it’s time to start your next improvement journey.
Project Summary Template
Use this downloadable template as the learning log for your improvement project. It is designed to be completed collaboratively to help your team track key findings and make informed choices about what to do next.
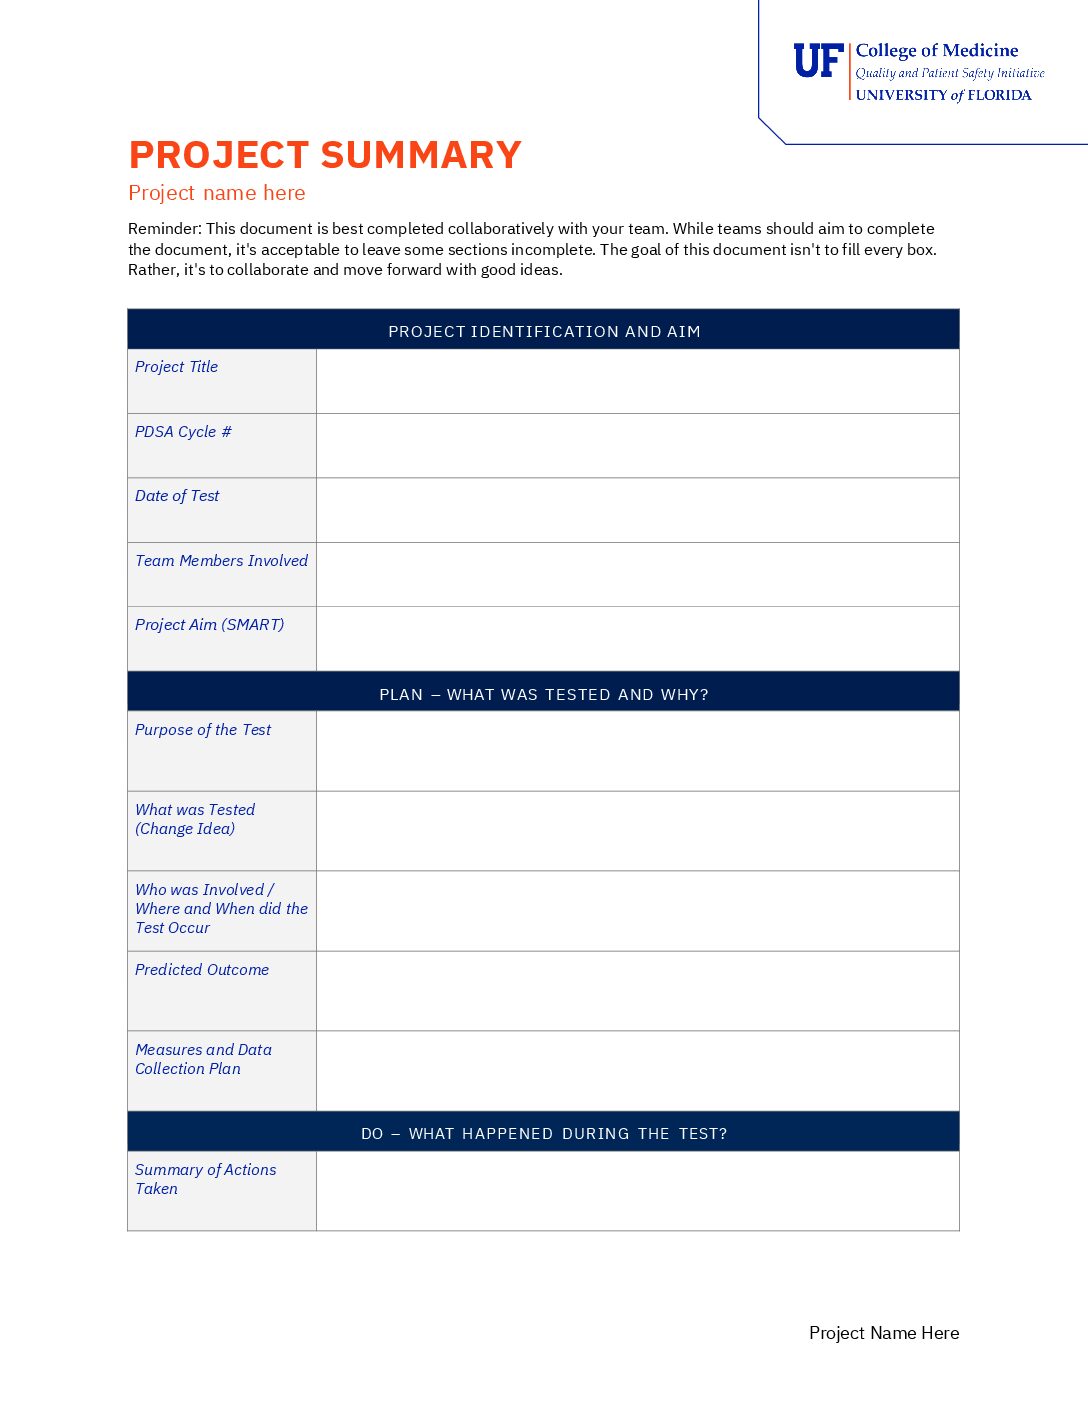
Download the Project Summary Template
This form provides a structured way to document each PDSA cycle and ensure your team captures key learnings. It includes sections to:
- Define your project title, team, and SMART aim.
- Detail the purpose of the test, the change idea, who is involved, your predicted outcome, and the data collection plan.
- Record a summary of the actions taken and key observations made during the test.