
 Nila Radhakrishnan, MD
  Tanja Magoc, Ph.D.
  Jeffrey B Miedema, MBA, RRT
 What is Process Mapping?
Clinical workflows can be incredibly complex, with many handoffs, decisions, and tasks happening in a sequence that isn’t always visible to everyone involved. Process mapping is the tool that makes the invisible visible. It is a systematic way to create a flowchart of a patient’s entire journey or a specific clinical procedure, illustrating every step from beginning to end. By visualizing the workflow, teams can gain a shared understanding of how things currently work, not just how they are supposed to work.
At its core, a process map uses a standard set of symbols to represent actions, decision points, and the overall flow of the process. This simple act of charting the course uncovers opportunities for improvement that might otherwise go unnoticed. It helps to pinpoint inefficiencies, highlight areas of ambiguity, and identify bottlenecks that delay care. Whether you are starting with a pen and sticky notes to map a simple task or using software to create a detailed diagram with multiple stakeholders, the goal is the same: to create a foundation for more streamlined, reliable, and safer patient care.
This page provides the resources to guide you from the basic principles of process mapping to more advanced techniques. By learning to map clinical processes, you can equip yourself with a powerful tool to drive meaningful improvements in your practice.
Resources
The videos and handouts below offer a step-by-step introduction to process mapping. They will guide you from understanding the basic concepts and building your first map to gathering data for complex projects and using advanced diagramming techniques.
Introducing Process Mapping
Understand the fundamentals of process mapping and how it helps visualize a patient’s journey. This video introduces the basic symbols used in a process map and explains how this tool can streamline workflows, reduce errors, and improve healthcare outcomes.
Transcript: Introducing Process Mapping
Imagine a flowchart detailing a patient’s entire journey from initial consult to follow up. Process mapping is one way to do this.
Process maps use a common set of symbols to represent each step in the patient’s journey, clearly identifying potential bottlenecks, inefficiencies, and areas for standardization. All process maps will show where the patient journey begins and ends, as well as processes and decisions made along the care pathway.
By visualizing the patient’s journey, process mapping enables streamlined workflows, reduces errors, clarifies roles, enhances communication, and ultimately leads to improved patient safety and better health care outcomes.
Process Mapping Infographic
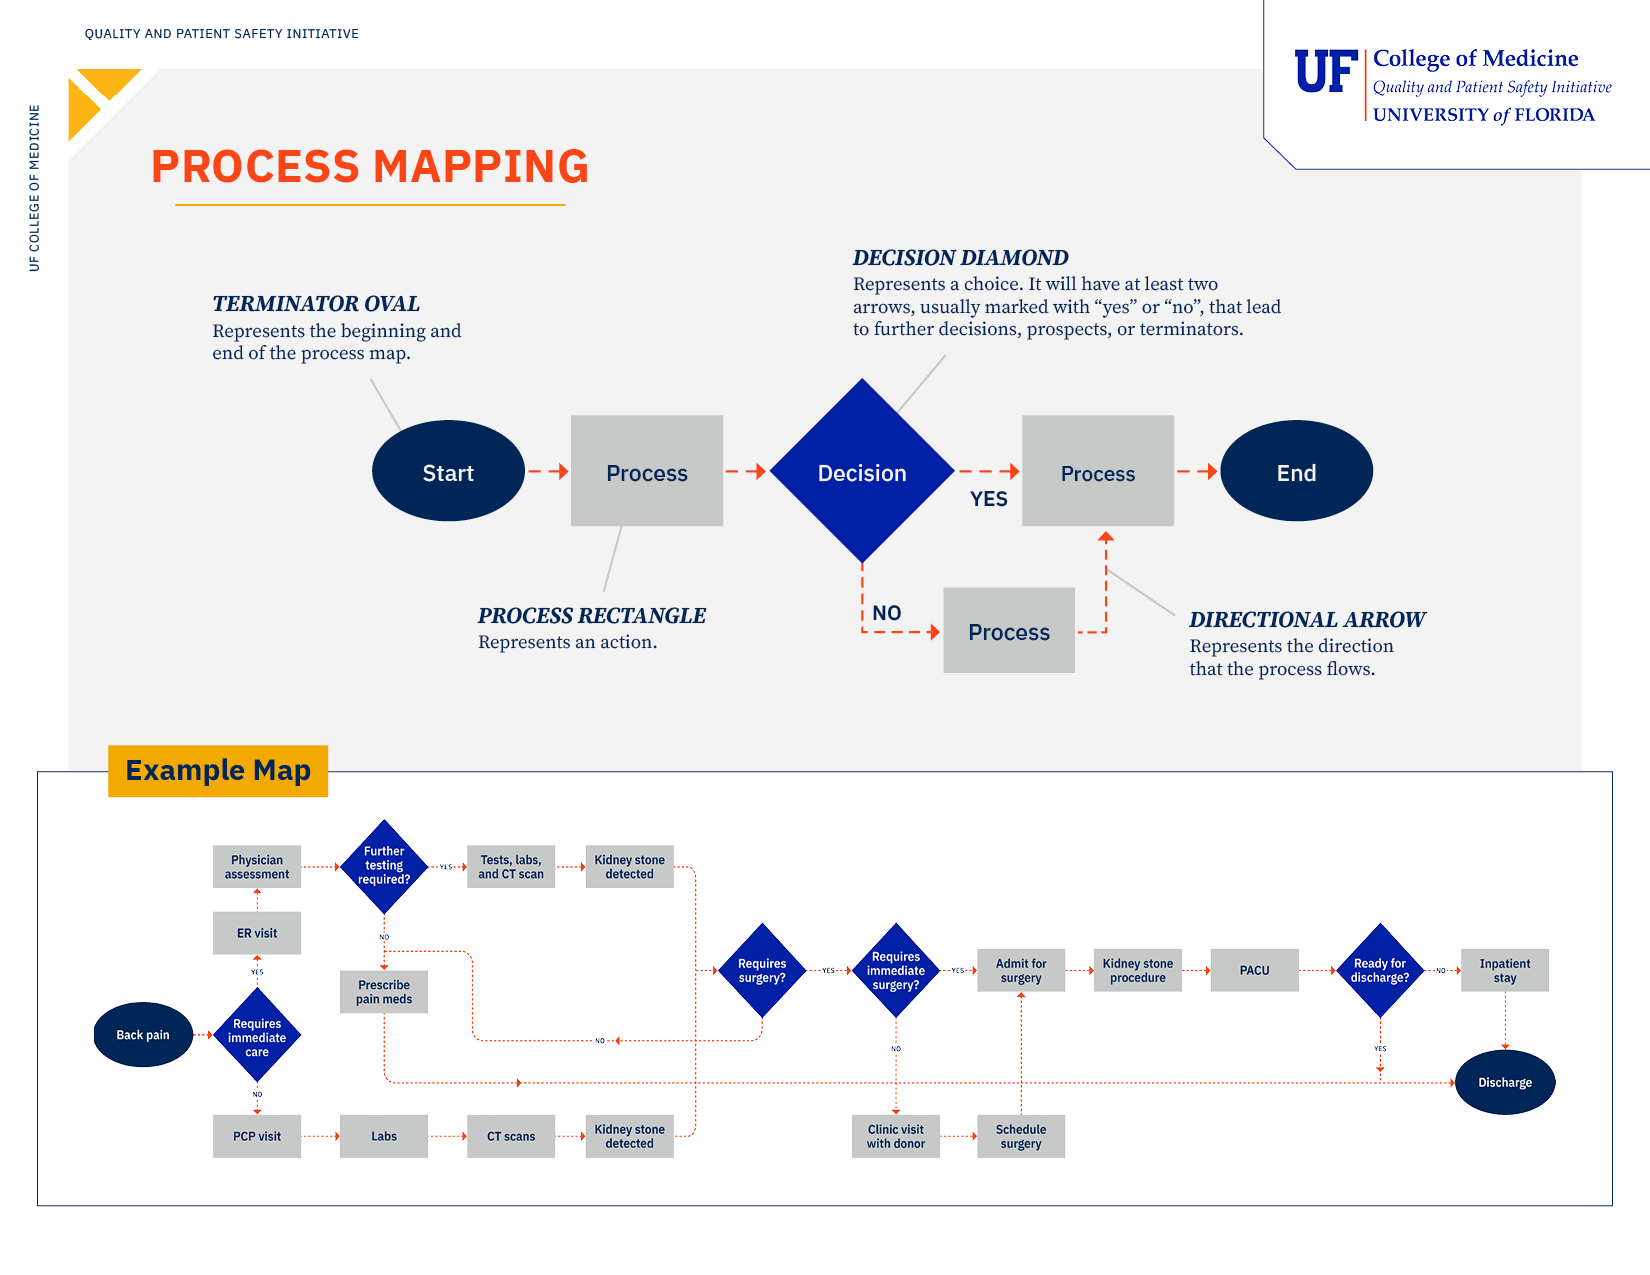
This document serves as a quick reference guide and visual worksheet for creating process maps. It defines the foundational symbols used to diagram patient safety and quality improvement workflows and provides a basic example of how these symbols connect to form a complete process pathway.
- Terminator Oval: Marks the specific starting and ending points of a process map.
- Process Rectangle: Represents a distinct action or task within the workflow.
- Directional Arrow: Indicates the flow and sequence of steps from one action to the next.
- Decision Diamond: Signifies a point where a choice must be made, splitting the path into at least two directions (typically labeled “yes” or “no”).
Designing a Simple Process Map
Learn how to build your first simple process map using a step-by-step example of checking a patient’s temperature. This tutorial covers the essential symbols for processes and decisions, helping you create a basic diagram to identify inefficiencies and opportunities for improvement.
Transcript: Process Mapping: Designing a Simple Process Map
A process map can help you improve patient care. A simple map will focus on the patient, tracking their journey through the process.
Your map will plot each step of the patient’s care pathway, ensuring that the tasks and decisions are represented. Keep in mind that an experienced clinician may be able to complete a simple diagram by themselves.
While it may seem like an experienced clinician can complete a process map alone, those creating a process map should be open to gathering information from other health care providers when needed. This helps ensure the map reflects the work as actually performed, not as it is imagined.
The first step in creating your map is to decide on a medium for your map. The easiest way is to start simple with post-it notes and a pen or marker. A more advanced method is to select a software program to bring your process map to life. Later videos will discuss more advanced process mapping methods.
For our first process map, let’s consider some symbols that are standards across health care process maps. These include process– designating a task or operation that needs to be done. Arrows designate the direction in which the process flows. Decisions represent moments when decisions are made.
Finally, terminators represent the beginning and multiple endings of the chart. The software package you choose for creating your process map will likely have extensive documentation of common symbols. Let’s start with mapping a very basic process. Checking a patient’s temperature.
The start of our map can be represented with an oval. Let’s label this patient arrives. We will connect this with an arrow to our first process. A process rectangle represents an action. In this case, take patient’s temperature.
This leads to a decision diamond. Here, we have a choice or decision that answers the question is temperature within normal range. Now we need two arrows. The yes arrow leads to document temperature in chart.
The no arrow leads to notify nurse. This leads to another process– document temperature in chart. Notice that this step occurs regardless of the temperature reading. We end this simple map with a terminator oval and label it temperature recorded to show the process completion.
This was a simple example, but these basic principles can be applied to any process in your clinical setting. As you map your process of interest, focus on flow and transitions. Identify bottlenecks, inefficiencies, and areas for improved communication.
This essential will drive process improvements. After all, a well-developed process map streamlines workflows, enhances communication, and leads to better patient outcomes.
Collecting Information for Process Maps
Discover key methods for collecting the detailed information needed for a comprehensive process map. This video outlines how to use direct observation and stakeholder interviews, and provides five essential questions to guide your investigation and ensure a thorough understanding of the process.
Transcript: Advanced Process Mapping: Collecting Information
Crafting a complex process map requires a diligent approach to information gathering. You can collect information via two methods. The first is direct observation in the clinical setting.
The second method is through meetings and discussions. Ideally, you will use both methods. And, of course, be sure to take extensive notes. Let’s explore the key steps to ensure you collect the necessary insights.
First, consider if you will be making the map yourself, or if you will need to coordinate with a clinician working in the target clinic on it. If you need to coordinate with others, explain the purpose of your project clearly.
This way, your informants can provide the most valuable information and resources. As you observe and converse with the clinician, take detailed notes. If possible, record the conversation. Encourage the clinician to freely explain the steps involved in caring for a patient.
Ask follow-up questions to delve deeper into the specifics. Be sure to gather details on the patient’s journey before arrival, during their time in the unit and after they depart.
Don’t stop there. Speak with other health care providers, such as nurses, pharmacists, therapists, and staff. This will help you understand their roles and interactions within the process.
Next, you will want to see how patients actually move through the physical clinic or unit. When observing the patient’s movements, be sure to arrive early and track their journey from reception to discharge. Multiple observation sessions may be necessary to capture the full scope of the process.
Across the entire information collection process, five essential questions can guide your investigation. Try to answer these questions at each step.
What data is collected? By whom? And where is it stored?
What information is provided to the patient, and by whom?
What decisions are made, and by whom?
How do clinicians communicate with each other?
When do specific steps occur in the care pathway, and in what order?
Finally, be sure to note any areas of variability in the care pathway. By meticulously gathering this information, you will lay the groundwork for a detailed and insightful process map, one that can drive meaningful improvements in patient care within your specialty.
Process Mapping: Tips for Collecting Information
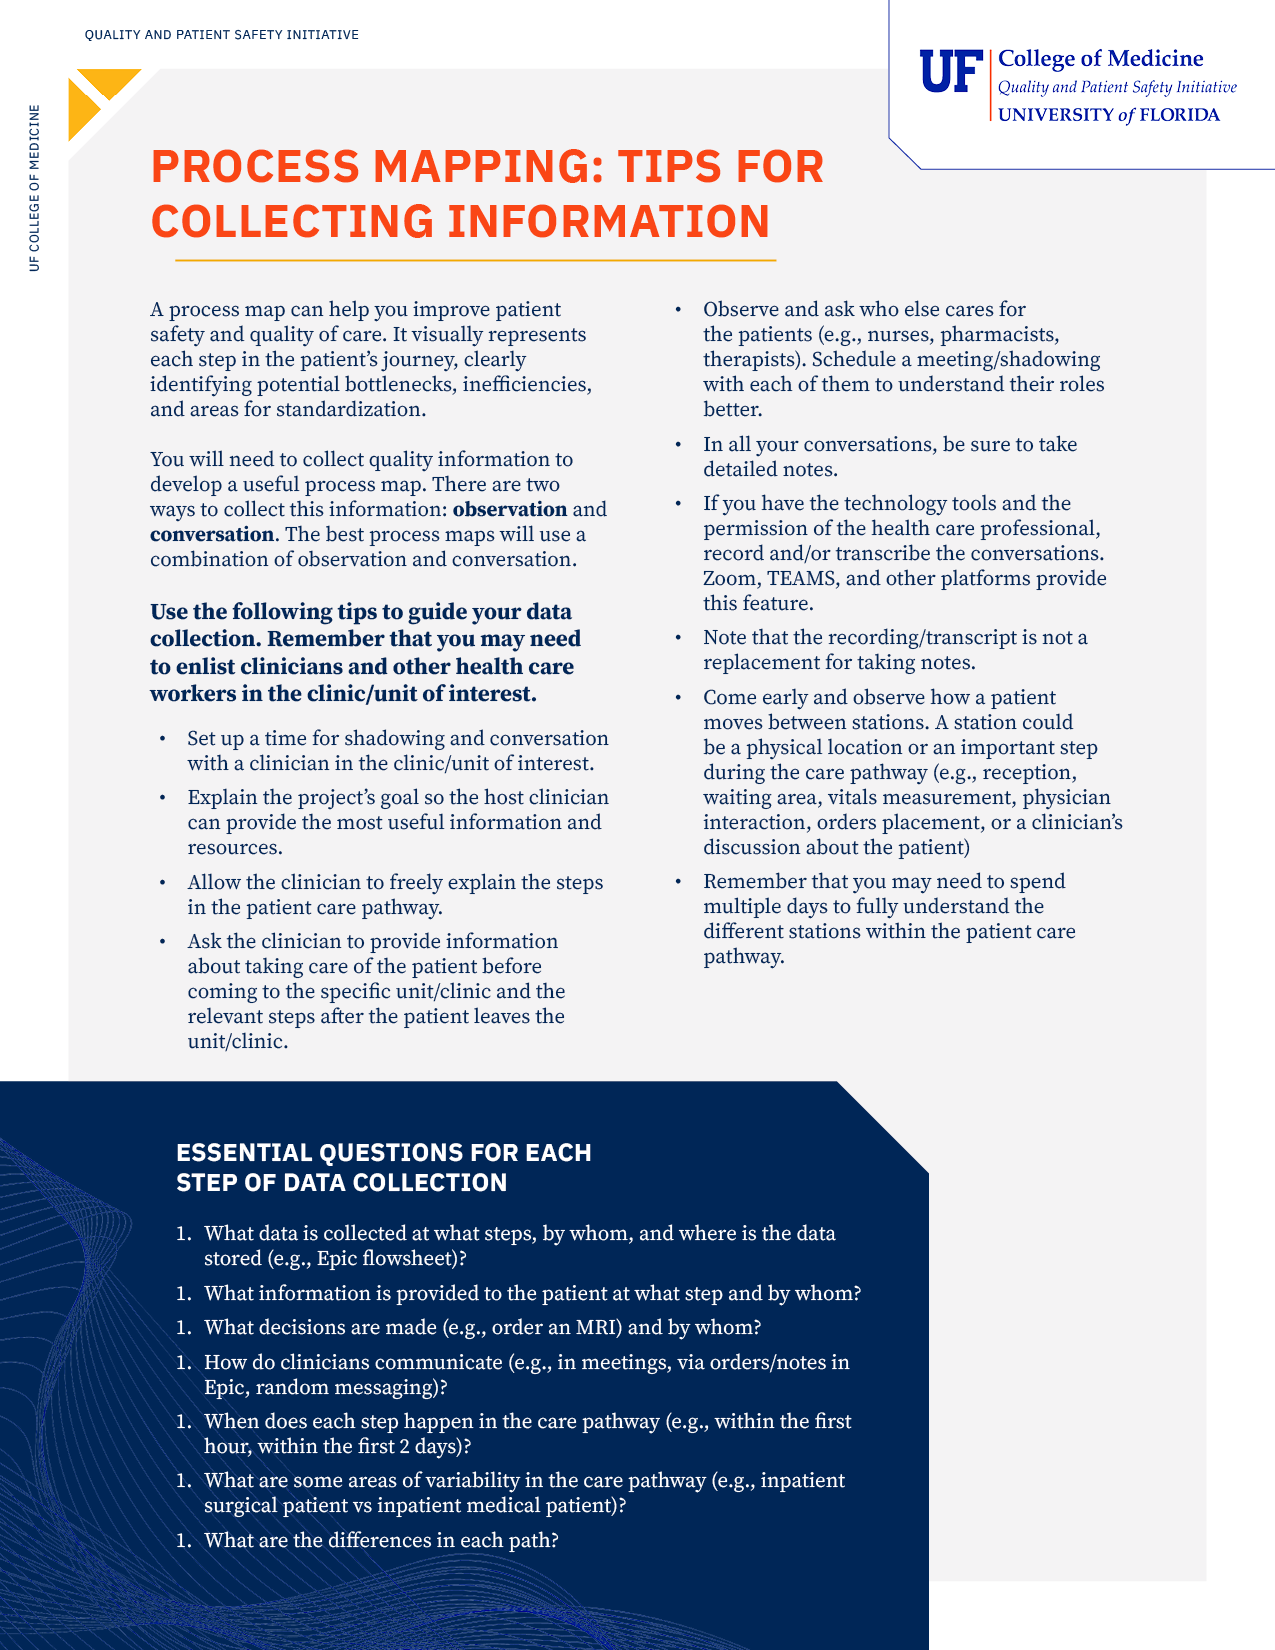
This document provides guidelines for collecting data to create an effective process map aimed at improving patient safety and healthcare quality. It highlights that the best process maps are developed using a combination of direct observation and conversations with clinicians. Additionally, it outlines essential questions to ask and practical tips for shadowing staff, mapping patient journeys, and documenting the care pathway effectively.Use this handout to remind you of key steps in collecting information for a process map. The handout also includes essential questions for the steps of data collection.
Download the Guide to Collecting Information
- Combine Observation and Conversation: To accurately map the patient journey, shadow clinicians and speak with various healthcare team members (e.g., nurses, pharmacists) to understand their specific roles and steps.
- Ask Targeted Questions: Focus data collection on identifying what data is collected, who makes decisions, how clinicians communicate, and where there is variability in the care path.
- Document Thoroughly: Always take detailed notes during observations and conversations. While recording or transcribing tools (like Zoom or Teams) are helpful with permission, they should not replace manual note-taking.
- Be Thorough and Patient: Fully understanding the different physical locations and steps (stations) a patient moves through may require observing early and spending multiple days analyzing the workflow.
Advanced Process Mapping with Swim Lanes
Explore advanced process mapping using swim lane diagrams to clarify roles and responsibilities within a complex workflow. This video explains how to create lanes for different stakeholders—like patients, clinicians, and systems—to visualize their interactions and improve communication.
Transcript: Advanced Process Mapping: Adding Swim Lanes
Process maps help optimize patient care by providing a visual blueprint to streamline processes, improve communication, and enhance patient outcomes.
Advanced maps often require input from various providers and administrators. This makes sense, as what distinguishes an advanced process map is the use of swim lanes. Swim lanes highlight who is responsible for each task and how different roles interact.
Swim lanes map interactions between the patient, clinicians, and even automated systems. Importantly, each swim lane represents a key stakeholder. When designing a swim lane diagram, consider the following features.
A dedicated patient lane is often placed at the top of the diagram to emphasize their central role. It tracks their journey through the process.
Advanced process maps include separate lanes for each health care worker type involved. For example, physicians, nurses, pharmacists, and therapists should be represented with their own lanes.
It’s helpful to include a lane for the health care system itself. This lane documents key alerts, automated messaging, and system clinician interactions.
Finally, consider a lane for data availability, indicating what information is collected and stored at each step.
While simple process maps can be created with pen and paper, advanced swim lane diagrams often benefit from more robust tools. There are multiple software packages available online with collaborative features. These packages will offer advanced diagramming capabilities. Whichever package you choose, it will offer detailed user instructions.
Remember, process maps are living documents that should evolve. Regularly review and update your diagram with feedback from frontline clinicians. Starting with the small focus process can make the task less daunting.
Investing time in creating a comprehensive, data-driven process map unlocks a powerful tool for optimizing patient care, streamlining workflows, enhancing communication, and improving patient outcomes.